This tutorial is also available in Russian on my company's blog.
This tutorial describes one of possible ways to edit your portrait shots in Adobe Photoshop. I will guide your through the basic editing process - no special color or graphic effects, no hardcore post-production. Ready? Let's begin.

 Step 1. Original photo.
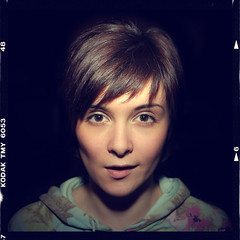
Here it is. It was taken in my studio after another commercial shooting without any preparations. The model is amateur, a friend asked to see her and make some test shots. She had only her daily make-up. I put her near the softbox and shoot in JPEG with Auto-WB. Click for fullsize. This is how the skin looks without professional make-up :)
 Step 2. Skin retouch.
I prefer to retouch the skin at the very beginning, without any tweaking unless you need any area lightened up to see more details. Open your image in Photoshop, choose
Healing Brush Tool (J) and remove all unwanted areas and spots. Click for fullsize, again.
 Step 3. Color and tone correction.
The image appears a bit dark to me and I don't like this warm color shift. On
Layers panel click
New Adjustment Layer icon and choose
Curves. While in RGB Channel Mode, set start point values to Output 20 / Input 10, end point to Output 250 / Input 250 and midpoint 130 / 95. This makes image lighter while remaining proper contrast and details. Now I want to eliminate warm color cast. Open Red Channel, set start point Input value to 10, end point Output value to 250. Open Blue Channel, set start point Output value to 5. These numbers are good for this particular photo. Play with values to get what you need. See screenshots below:


Now it looks quite good, but I'm not satisfied with the eyes color and warm tones.

Step 4. The Eyes.
Create new empty layer, select
Brush Tool (B) and choose brush size same as pupil. Choose a color which will strengthen the original color. I used desaturated blue (166;183;190). Draw circles over the eyes, then use
Eraser Tool (E) to fit the form.

On
Layers Panel choose
Soft Light blending for this layer. It does not produce any color pop-out effect so the eyes still look natural.
 Step 5. Red tones.
I am still not satisfied with the red tones of the image. Let's soften them a little and make cooler tones. Click
New Adjustment Layer and choose
Selective Color. The only color we are going to edit is Red and it opens by default. Set Black to -25, it will make the skin texture look softer by decreasing local contrast for the red color. Then add some Yellow and Cyan (+10 and +25) to get the tone I like better. Feel free to play with numbers.
 Step 6. Sharpening
.
Now we've got a photo that looks much better. The only step left is sharpening. I prefer to use different sharpening technics and settings for different sizes and mediums. Now we are going to use it on our website on the Web resized to 600x900px. In this case I recommend to use
Unsharp Mask Filter with Amout of 60% and Radius 0,6px (these are my "everyday" settings for web). And we are done. See the "Before and After" image on the top of the entry.
 Also we need a black scotch tape, scissors and ruler. Measure your off-camera flash's head. My Canon SpeedLite 550EX head is approx. 75x45mm. Grab your can, draw marks and make 40-50mm cuts. Put it on flash head and use scotch tape to fix the new form. Of course, you can cover all the can carefully with black scotch tape and make it look a bit better. I left it like this. Congrats, you are done! Here is how it looks on flash:


